Welcome to MDGSF's Blog!
This is my github blog-
[算法学习][leetcode] 231 Power of Two
https://leetcode.com/problems/power-of-two/description/
题目
Given an integer, write a function to determine if it is a power of two.
题目翻译
题目解析
判断一个数是不是2的幂。
参考答案
class Solution {
public:
    bool isPowerOfTwo(int n) {
        if(n<=0)
        {
            return false;
        }

        return (n&(n-1)) == 0;
    }
};
-
[算法学习][leetcode] 191 Number of 1 Bits
https://leetcode.com/problems/number-of-1-bits/description/
题目
Write a function that takes an unsigned integer and returns the number of ’1’ bits it has (also known as the Hamming weight).
For example, the 32-bit integer ’11’ has binary representation 00000000000000000000000000001011, so the function should return 3.
题目翻译
题目解析
求一个数的二进制中有多少个1。
参考答案
class Solution {
public:
    int hammingWeight(uint32_t n) {
        if(0==n) {
            return 0;
        }
        int iCount = 1;
        while (n = n & (n-1))
        {
            iCount++;
        }
        return iCount;
    }
};
-
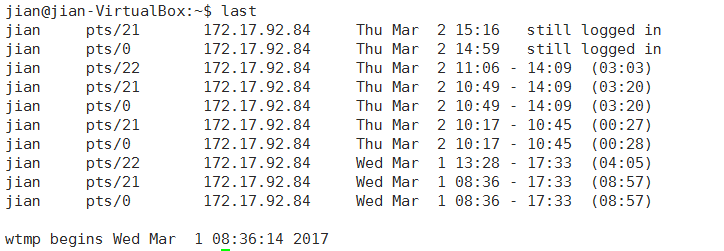
[Linux][常用命令] last查看现在与过去登录过系统的用户
1 last
2 last -n 3

-
[Linux][常用命令] AWK
1
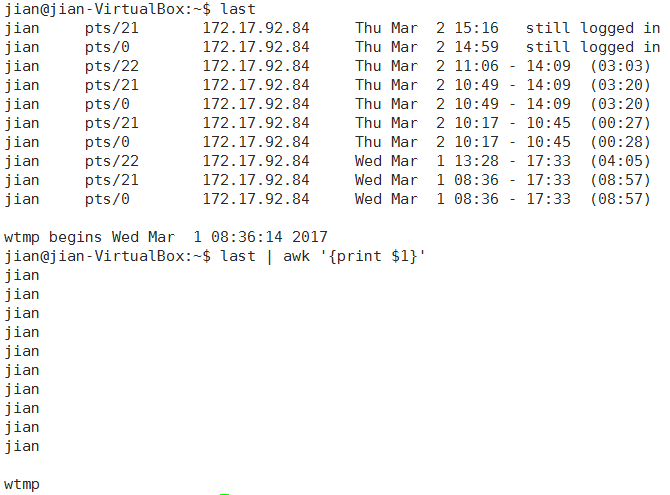
awk工作流程是这样的:读入有’\n’换行符分割的一条记录,然后将记录按指定的域分隔符划分域,填充域, $0则表示所有域,$1表示第一个域,$n表示第n个域。默认域分隔符是”空白键” 或 “[tab]键”, 所以$1表示登录用户,$3表示登录用户ip,以此类推。
2 只是显示/etc/passwd的账户
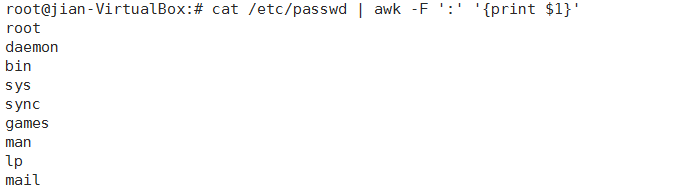
这种是awk+action的示例,每行都会执行action{print $1}。
-F指定域分隔符为’:’。
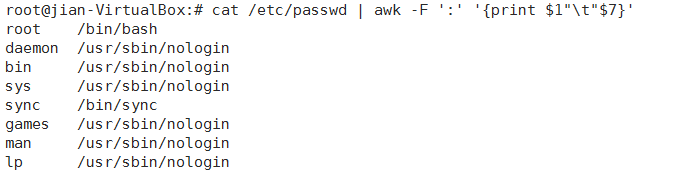
3 只是显示/etc/passwd的账户和账户对应的shell,而账户与shell之间以tab键分割
4 只是显示/etc/passwd的账户和账户对应的shell,而账户与shell之间以逗号分割,而且在所有行添加列名name,shell,在最后一行添加”blue,/bin/nosh”。
root@jian-VirtualBox:# cat /etc/passwd | awk -F ':' 'BEGIN{print "name,shell"} {print $1"\t"$7} END{print "blue,/bin/nosh"}'
name,shell
root /bin/bash
daemon /usr/sbin/nologin
bin /usr/sbin/nologin
sys /usr/sbin/nologin
....
mosquitto /bin/bash
postgres /bin/bash
blue,/bin/nosh
awk工作流程是这样的:先执行BEGING,然后读取文件,读入有/n换行符分割的一条记录,然后将记录按指定的域分隔符划分域, 填充域,$0则表示所有域,$1表示第一个域,$n表示第n个域,随后开始执行模式所对应的动作action。 接着开始读入第二条记录······直到所有的记录都读完,最后执行END操作。
5 搜索/etc/passwd有root关键字的所有行
root@jian-VirtualBox:# awk -F: '/root/' /etc/passwd
root:x:0:0:root:/root:/bin/bash
6 搜索/etc/passwd有root关键字的所有行,并显示对应的shell
root@jian-VirtualBox:# awk -F: '/root/{print $7}' /etc/passwd
/bin/bash
7 awk有许多内置变量用来设置环境信息,这些变量可以被改变,下面给出了最常用的一些变量。
ARGC               命令行参数个数
ARGV               命令行参数排列
ENVIRON            支持队列中系统环境变量的使用
FILENAME           awk浏览的文件名
FNR                浏览文件的记录数
FS                 设置输入域分隔符,等价于命令行 -F选项
NF                 浏览记录的域的个数
NR                 已读的记录数
OFS                输出域分隔符
ORS                输出记录分隔符
RS                 控制记录分隔符
8 统计/etc/passwd:文件名,每行的行号,每行的列数,对应的完整行内容
root@jian-VirtualBox:# awk -F ':' '{print "filename:" FILENAME ",linenumber:" NR ",columns:" NF ",linecontent:" $0}' /etc/passwd
filename:/etc/passwd,linenumber:1,columns:7,linecontent:root:x:0:0:root:/root:/bin/bash
filename:/etc/passwd,linenumber:2,columns:7,linecontent:daemon:x:1:1:daemon:/usr/sbin:/usr/sbin/nologin
filename:/etc/passwd,linenumber:3,columns:7,linecontent:bin:x:2:2:bin:/bin:/usr/sbin/nologin
filename:/etc/passwd,linenumber:4,columns:7,linecontent:sys:x:3:3:sys:/dev:/usr/sbin/nologin
filename:/etc/passwd,linenumber:5,columns:7,linecontent:sync:x:4:65534:sync:/bin:/bin/sync
root@jian-VirtualBox:# awk -F ':' '{printf("filename:%10s,linenumber:%s,columns:%s,linecontent:%s\n", FILENAME, NR, NF, $0)}' /etc/passwd filename:/etc/passwd,linenumber:1,columns:7,linecontent:root:x:0:0:root:/root:/bin/bash filename:/etc/passwd,linenumber:2,columns:7,linecontent:daemon:x:1:1:daemon:/usr/sbin:/usr/sbin/nologin filename:/etc/passwd,linenumber:3,columns:7,linecontent:bin:x:2:2:bin:/bin:/usr/sbin/nologin filename:/etc/passwd,linenumber:4,columns:7,linecontent:sys:x:3:3:sys:/dev:/usr/sbin/nologin filename:/etc/passwd,linenumber:5,columns:7,linecontent:sync:x:4:65534:sync:/bin:/bin/sync9 统计/etc/passwd的账户人数
root@jian-VirtualBox:# awk 'BEGIN{count=0; print "[start]user count is ", count} {count=count+1;print $0;} END{print "[end]user count is ", count}' /etc/passwd
[start]user count is  0
root:x:0:0:root:/root:/bin/bash
daemon:x:1:1:daemon:/usr/sbin:/usr/sbin/nologin
bin:x:2:2:bin:/bin:/usr/sbin/nologin
...
ftp:x:122:129:ftp daemon,,,:/srv/ftp:/bin/false
mosquitto:x:1001:1001:mosquitto,2123,3213,321,33123:/home/mosquitto:/bin/bash
postgres:x:123:130:PostgreSQL administrator,,,:/var/lib/postgresql:/bin/bash
[end]user count is  45
10 统计某个文件夹下的文件占用的字节数
root@jian-VirtualBox:# ls -l | awk 'BEGIN{size=0;} {size=size+$5;} END{print "[end]size is ", size}'
[end]size is  55837
root@jian-VirtualBox:# ls -l | awk 'BEGIN{size=0;} {size=size+$5;} END{print "[end]size is ", size/1024}'
[end]size is  54.5283
11 如果以M为单位显示
root@jian-VirtualBox:# ls -l | awk 'BEGIN{size=0;} {size=size+$5;} END{print "[end]size is ", size/1024/1024}'
[end]size is  0.0532503
12 统计某个文件夹下的文件占用的字节数,过滤4096大小的文件(一般都是文件夹)
root@jian-VirtualBox:# ls -l | awk 'BEGIN{size=0;print "[start]size is", size} {if($5!=4096){size=size+$5}} END{print "[end]size is", size/1024/1024, "M"}'
[start]size is 0
[end]size is 1024.23 M
13 显示/etc/passwd的账户
root@jian-VirtualBox:# awk -F ':' 'BEGIN{count=0;} {name[count]=$1;count++;} END{for(i=0;i<NR;i++){print i,name[i]}}' /etc/passwd
0 root
1 daemon
2 bin
3 sys
4 sync
5 games
6 man
http://www.cnblogs.com/ggjucheng/archive/2013/01/13/2858470.html
-
[GDB] 生成core文件调试
core 文件生成
//test.c
#include <stdio.h>

const char * p = "hello world";

int main()
{
    ((char*)p)[0] = 'T';
    return 0;
}
g++ -g test.c
./a.out
Segmentation fault (core dumped)
但是,并没有生成core文件。
这是因为系统默认core文件大小为0。
可以使用ulimit -c修改。
ulimit -c

ulimit -c 1000

ulimit -c unlimited
gdb a.out core
gdb中键入where就可以查看到在哪里奔溃。
http://blog.csdn.net/longxj04/article/details/7716818
在下列条件下不产生 core 文件
(a)进程是设置用户 ID 的,而且当前用户并非程序文件的所有者。
(b)进程是设置组 ID 的,而且当前用户并非该程序文件的组所有者。
(c)用户没有写当前工作目录的权限。
(d)文件已存在,而且用户对该文件没有写权限。
(e)文件太大(RLIMIT_CORE 限制)。
-
[C/C++] virtual
#include <stdio.h> class CPolygon { public: void set_values(int a, int b) { width = a; height = b; } virtual int area() { return 0; } void name() { printf("CPolygon\n"); } protected: int width; int height; }; class CRectangle : public CPolygon { public: int area() { return width * height; } void name() { printf("CRectangle\n"); } }; class CTriangle : public CPolygon { public: int area() { return width * height / 2; } void name() { printf("CTriangle\n"); } }; int main() { CPolygon poly; CRectangle rect; CTriangle trgl; CPolygon * p1 = &poly; CPolygon * p2 = ▭ CPolygon * p3 = &trgl; p1->set_values(4, 5); p2->set_values(4, 5); p3->set_values(4, 5); printf("p1: %d\n", p1->area()); //0 printf("p2: %d\n", p2->area()); //20 printf("p3: %d\n", p3->area()); //10 //CRectangle * p4 = &poly; CRectangle * p5 = ▭ //CRectangle * p6 = &trgl; p1->name(); //CPolygon p2->name(); //CPolygon p3->name(); //CPolygon return 0; }http://www.cnblogs.com/ggjucheng/archive/2012/01/02/2310487.html
- Jekyll 1
- C/C++ 63
- Linux 59
- Web 25
- Qt 12
- Art 124
- Windows 17
- PHP 8
- Network 16
- GDB 3
- lwip 2
- DesignPattern 6
- pthread 6
- CPrimerPlus 9
- tester 3
- GO 75
- openssl 7
- FreeRTOS 9
- 数据库 4
- vk_mj 7
- transdata 3
- Git 7
- lua 20
- nginx 19
- boost 9
- python 18
- google 1
- Redis 1
- miscellanea 11
- life 2
- GCTT 9
- Rust 15
- C语言 2
- TeX 3
- fp 1